Step 6: Review & Launch
Step 6 of 6 -- Review & Launch
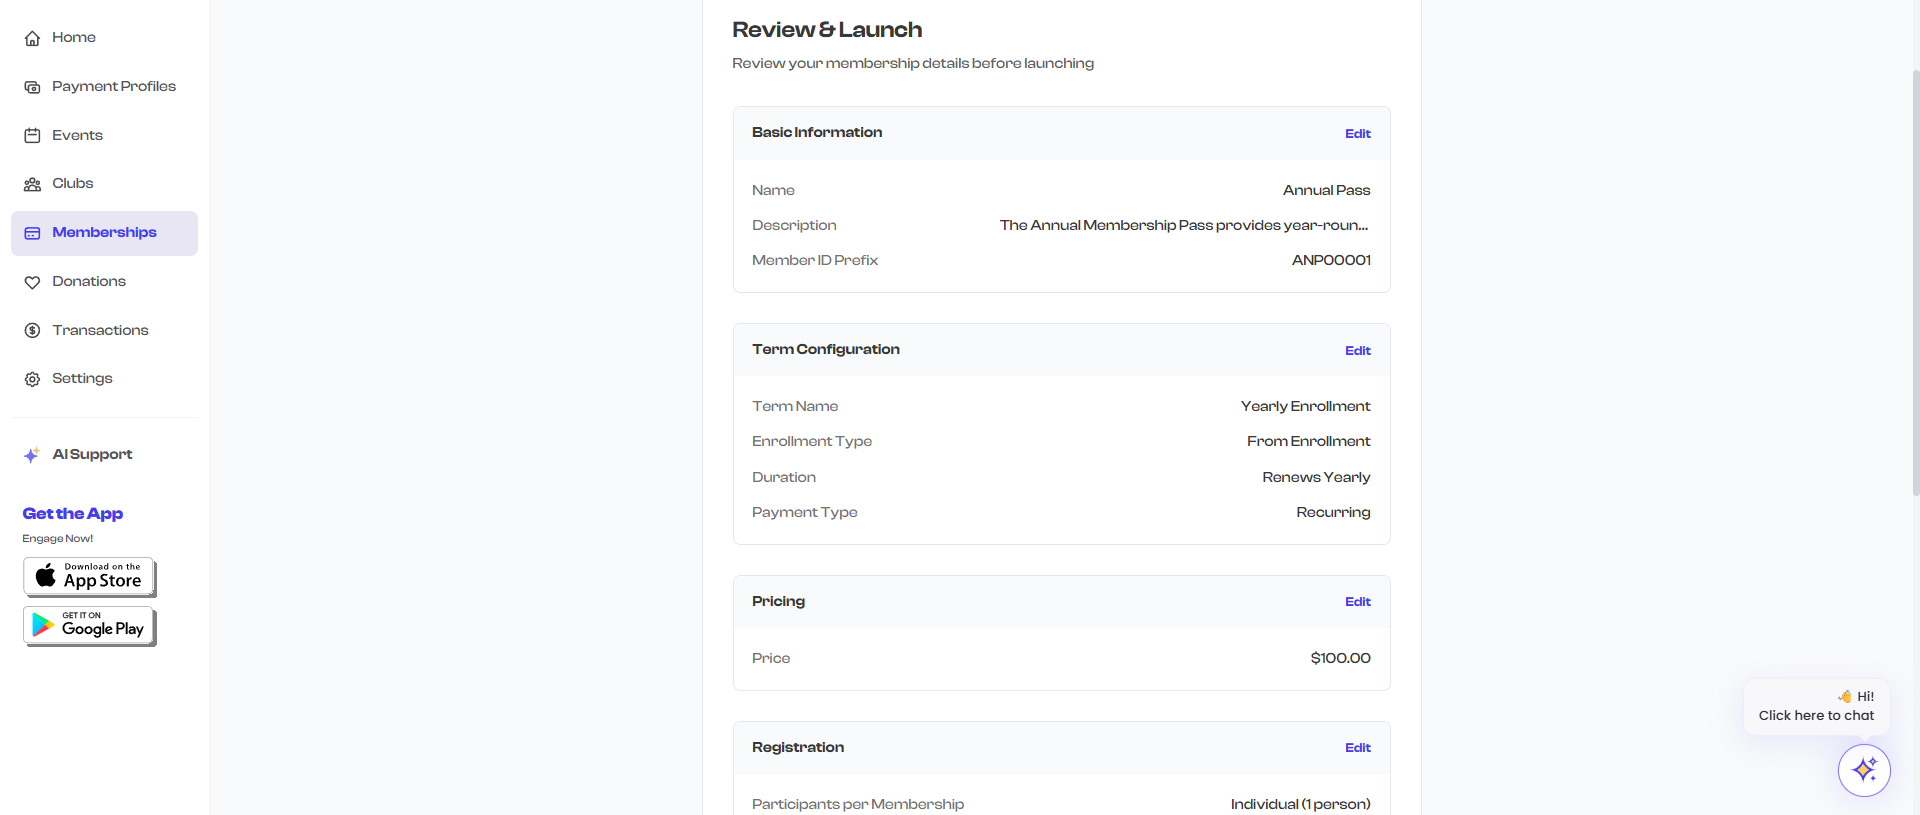
The final step of the membership creation wizard presents a complete summary of everything you have configured. This is your chance to review all the details before making the membership live.
The Review Screen
The review screen is organized into collapsible sections, each corresponding to a step in the wizard. Every section has an Edit link that takes you directly back to that step if you need to make changes.
What Each Section Shows
Basic Information
| Field | What It Shows |
|---|---|
| Name | The membership name you entered |
| Description | The full description text |
| Member ID Prefix | The prefix combined with the starting serial number (e.g., GLD00001) |
Term Configuration
| Field | What It Shows |
|---|---|
| Term Name | The name of the selected term |
| Enrollment Type | Fixed Period, From Enrollment, or Lifetime |
| Duration | How the term renews (e.g., "Renews Monthly", "Fixed Period (One-time)", "Lifetime") |
| Payment Type | Recurring or One-time |
| Grace Period | Number of days (shown only for recurring terms with a grace period) |
| Auto-Renewal | Whether auto-renewal is enabled (shown only if enabled) |
Pricing
| Field | What It Shows |
|---|---|
| Price | The fee amount with currency symbol (e.g., "$50.00") or "Free" |
| Access | "Invite Only" (shown only if the membership is restricted) |
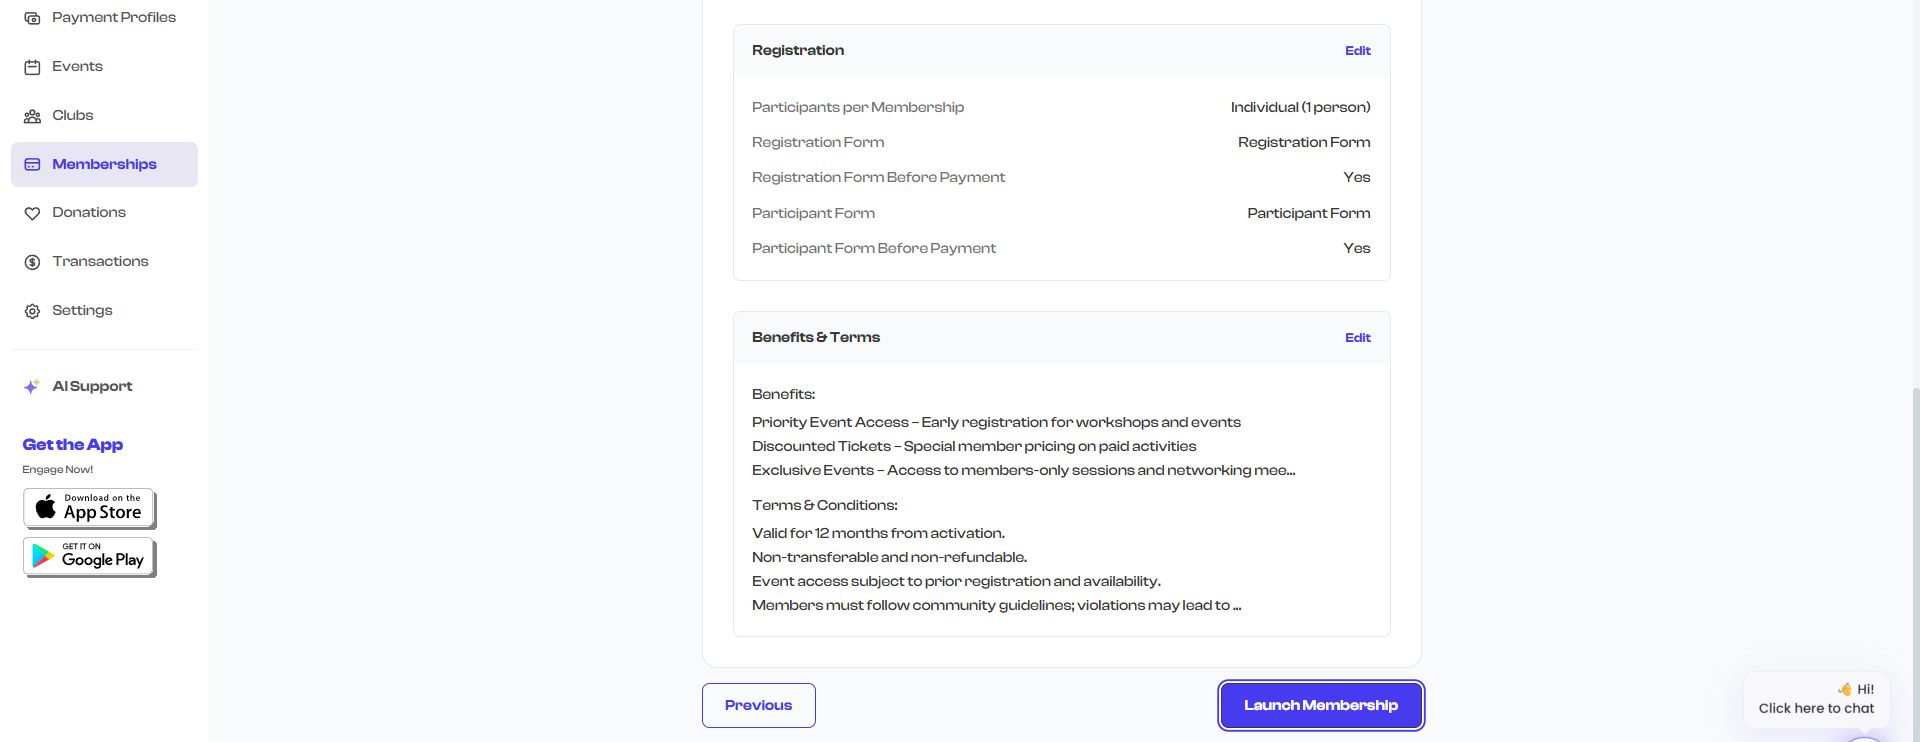
Registration
| Field | What It Shows |
|---|---|
| Participants per Membership | "Individual (1 person)" or "Group (X people)" |
| Registration Form | The form name or "None selected" |
| Registration Form Before Payment | "Yes" or "No" (shown only if a form is attached) |
| Participant Form | The form name or "None selected" |
| Participant Form Before Payment | "Yes" or "No" (shown only if a form is attached) |
Media
| Field | What It Shows |
|---|---|
| Media | Number of photos and videos uploaded (e.g., "2 photos, 1 video uploaded") |
This section only appears if you uploaded at least one media item in Step 5.
Benefits & Terms
| Field | What It Shows |
|---|---|
| Benefits | A preview of the benefits text (truncated to 200 characters if longer) |
| Terms & Conditions | A preview of the terms text (truncated to 200 characters if longer) |
Making Edits
If you spot something that needs to be changed, click the Edit link in the section header. You will be taken back to the corresponding step where you can make your changes. After editing, use the step progress bar at the top to navigate back to the Review step, or click through each step with the Next button.
You do not need to re-complete all intermediate steps when jumping back. Click directly on Step 6 in the progress bar to return to the review screen after making your edit.
Launching the Membership
When you are satisfied with all the details, click the Launch Membership button at the bottom of the screen.
What Happens When You Launch
When you click Launch Membership, the following occurs:
- All required steps are validated -- If any required field is missing or invalid, you are taken back to that step with an error message.
- Media is uploaded -- If you added photos or videos, they are uploaded to cloud storage.
- The membership is created -- The membership plan is saved to your organization's account with an Active status.
- You are redirected to the Membership Dashboard, where you can see your new membership in the Active tab.
Memberships are launched with an Active status, meaning they are immediately available for members to enroll. If you want to create a membership but not make it available yet, you can change its status to Inactive from the membership detail page after creating it.
Editing After Launch
Yes, you can edit a membership after it has been launched. From the Membership Dashboard:
- Click on the membership you want to edit.
- Click the Edit button on the membership detail page.
- The same wizard opens with all your existing data pre-filled.
- Make your changes and click Update Membership.
Be cautious when editing memberships that already have enrolled members. Changing the price, term, or benefits will affect the membership plan going forward, but existing enrollments retain the terms they signed up under (their enrollment includes a snapshot of the membership details at the time of purchase).
Before You Launch: Checklist
Use this checklist to make sure everything is ready:
- Membership name is clear and descriptive
- Description accurately explains what the membership includes
- Member ID prefix is correct (it will be used for all future member IDs)
- Term matches your intended billing and validity period
- Price is set correctly (double-check free vs. paid)
- Processing fee setting is correct (are you absorbing fees or passing them to members?)
- Registration forms are attached if needed (with correct "before payment" settings)
- Benefits clearly communicate the value of the membership
- Terms & conditions cover your cancellation, refund, and conduct policies
- Payment profile is set up (for paid memberships -- check Dashboard > Settings > Payments)
What's Next?
After launching your membership, you can:
- View the membership on your Membership Dashboard to see it in the Active tab
- Share the membership with potential members by sharing your organization's profile link
- Manually add members who sign up offline -- see Managing Members
- Track enrollments as members start signing up
- Edit or update the membership at any time from the detail page