Offline Tickets
Offline ticket issuance lets you manually create tickets for attendees who pay outside of the standard online checkout flow. This is useful for walk-in registrations, cash payments, check payments, or any situation where a ticket needs to be issued without processing an online payment.
When to Use Offline Tickets
Use offline ticket issuance when:
- An attendee pays with cash at the venue or office.
- Payment is received via check, bank transfer, or another offline method.
- You need to issue a complimentary ticket for sponsors, speakers, or guests.
- An attendee has already paid through a channel outside of FeatsClub (Zelle, Venmo, UPI, etc.).
Accessing the Issue Tickets Wizard
- Navigate to the Event Dashboard and select the ticketed event.
- On the event detail page, select the Issue Tickets button in the ticket section.
- The three-step ticket issuance wizard opens.

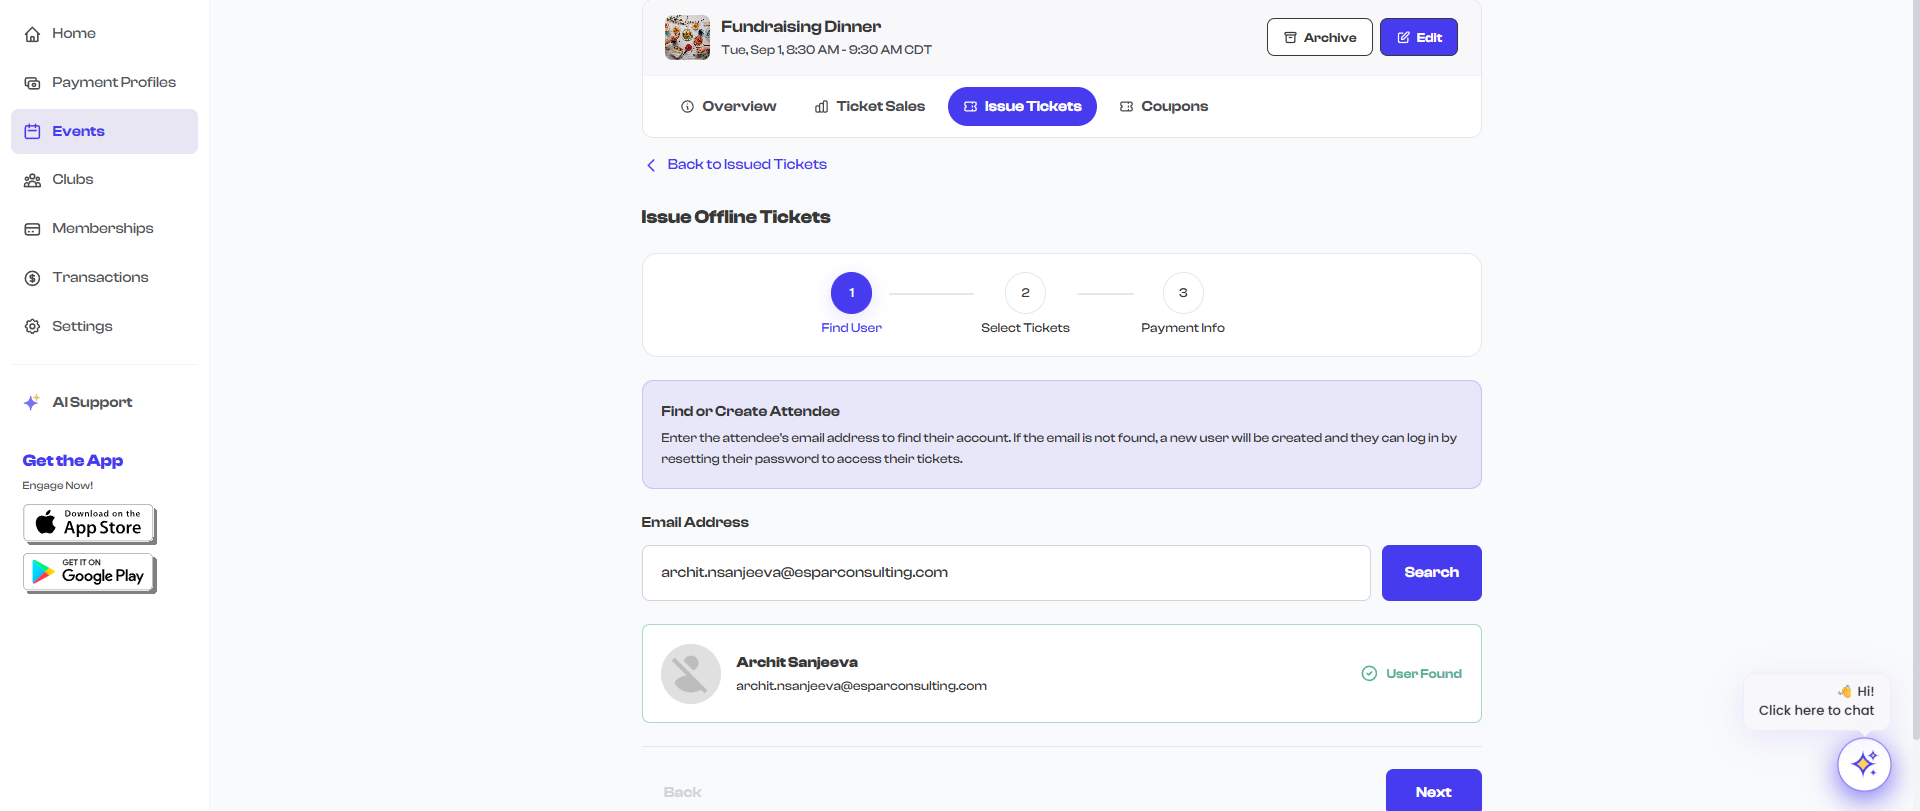
Step 1: Find User
The first step is to identify the person who will receive the ticket.
Search for an Existing User
- Enter the attendee's email address in the search field.
- If the email matches an existing FeatsClub user, their profile information (name, email) is displayed.
- Confirm the user and proceed to the next step.
Create a New User
If the attendee does not have a FeatsClub account:
- Enter their email address in the search field.
- When no match is found, you are prompted to create a new account.
- Enter the attendee's name and email to create their account.
- Proceed to the next step.
Creating a new user account during ticket issuance registers them on FeatsClub with the provided name and email. They can later log in to access their ticket and event details.
Step 2: Select Tickets
In this step, you choose which tickets to issue and how many.
- The available ticket types for the event are displayed, each showing the ticket name, price, and remaining availability.
- For each ticket type, use the quantity selector to set how many tickets to issue.
- You can issue tickets of multiple types in a single transaction.
- Tickets that have reached their capacity limit will show as unavailable.
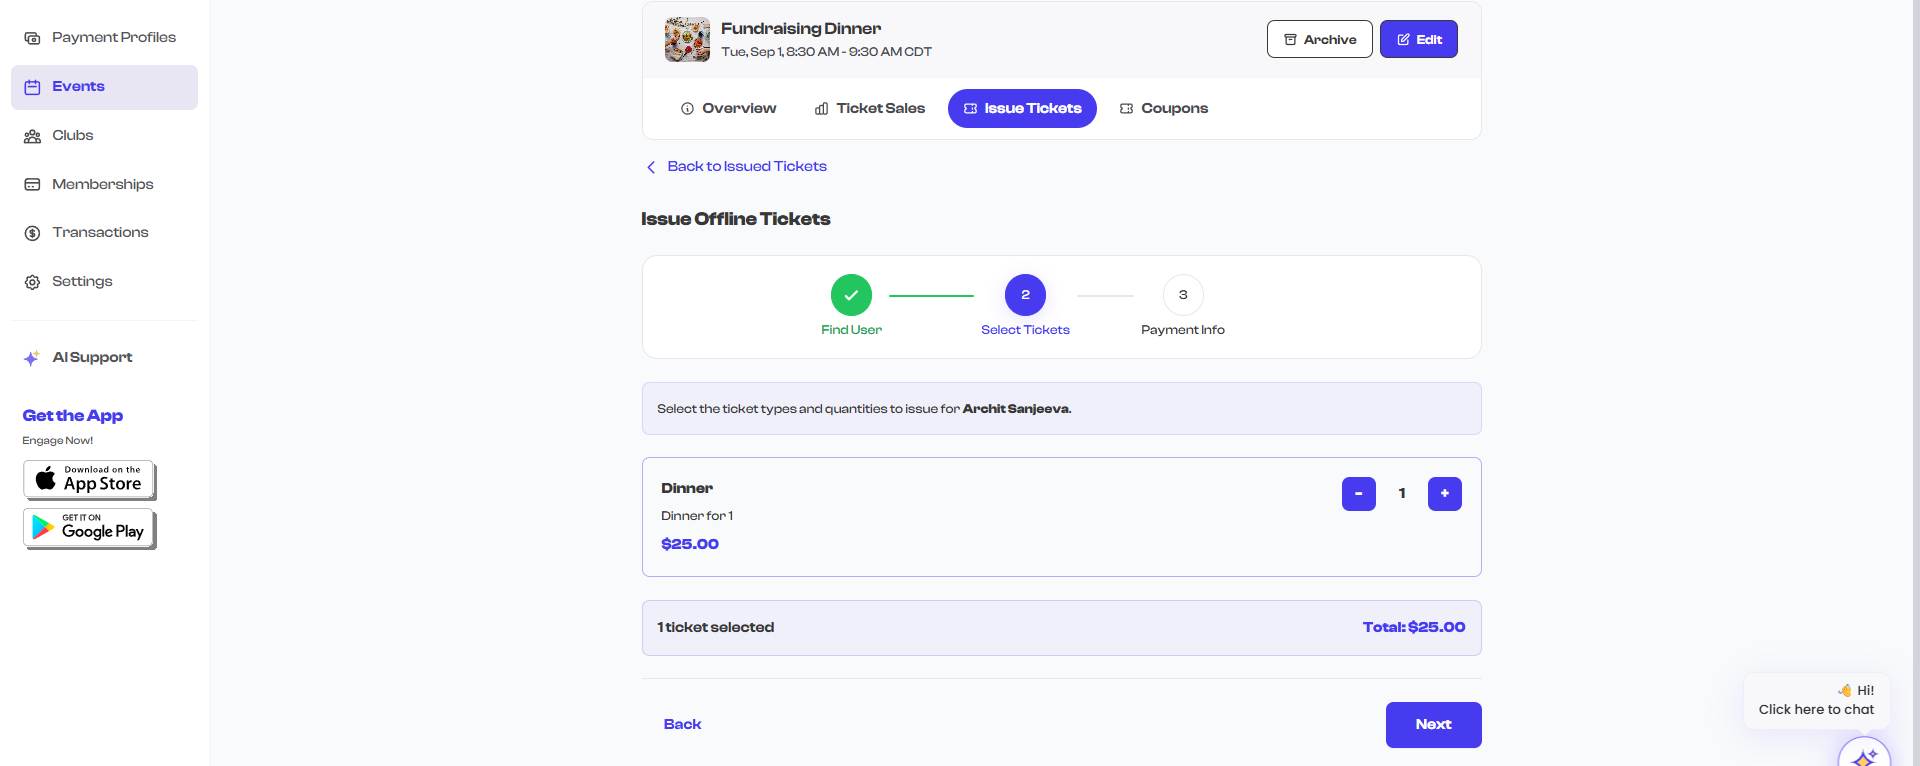
Offline tickets count toward the event's total ticket capacity. If a ticket type has a limited capacity, only the remaining availability is shown for issuance.
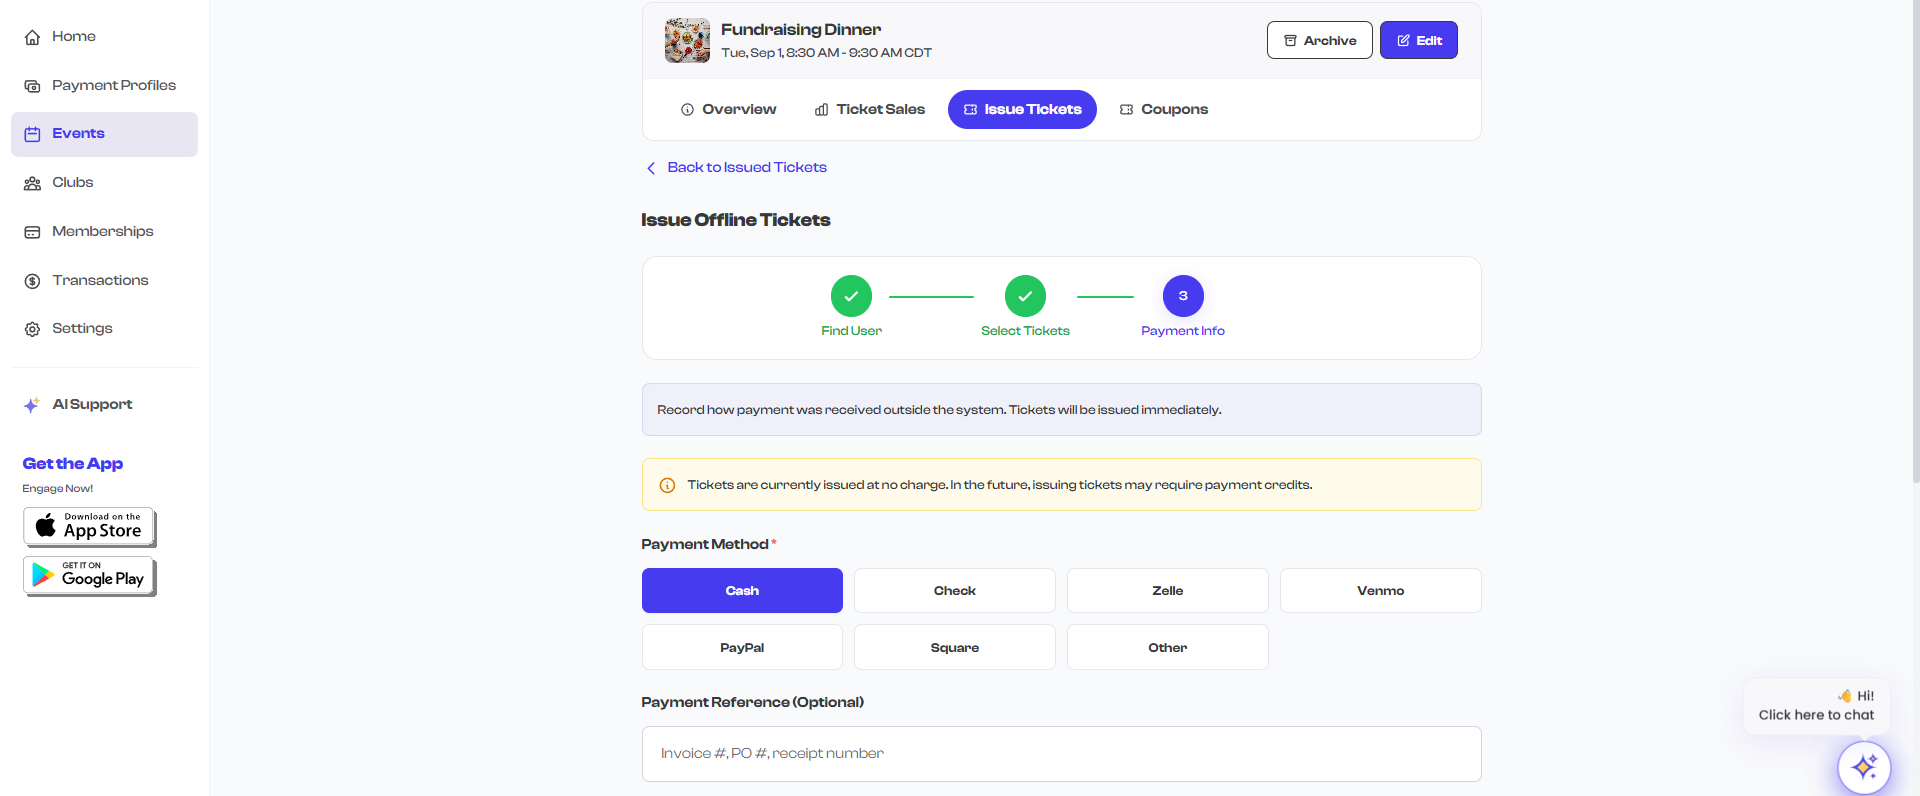
Step 3: Payment Info
The final step records how payment was received.
Selecting a Payment Platform
The available payment methods depend on the event's currency:
USD Events (United States)
| Payment Method | Description |
|---|---|
| CASH | Cash payment received in person |
| CHECK | Payment by personal or business check |
| ZELLE | Payment received via Zelle transfer |
| VENMO | Payment received via Venmo |
| PAYPAL | Payment received via PayPal |
| SQUARE | Payment processed through Square |
| OTHER | Any other payment method |
INR Events (India)
| Payment Method | Description |
|---|---|
| CASH | Cash payment received in person |
| UPI | Payment received via UPI (Unified Payments Interface) |
| PHONEPE | Payment received via PhonePe |
| GOOGLEPAY | Payment received via Google Pay |
| PAYTM | Payment received via Paytm |
| NETBANKING | Payment received via net banking transfer |
| CHECK | Payment by check |
| OTHER | Any other payment method |
Recording Payment Details
After selecting the payment method:
- Optionally enter a reference number -- a transaction ID, check number, or any identifier for the payment.
- Optionally enter remarks -- any notes about the transaction (e.g., "Cash received at front desk").
- Review the ticket summary showing the attendee, ticket types, quantities, and total amount.
- Select Issue Tickets to complete the process.
Success Confirmation
After tickets are successfully issued:
- A success screen is displayed confirming the ticket issuance.
- The issued QR codes are shown -- one for each ticket issued.
- These QR codes can be used for check-in at the event venue.
- The attendee can also access their tickets by logging into their FeatsClub account.
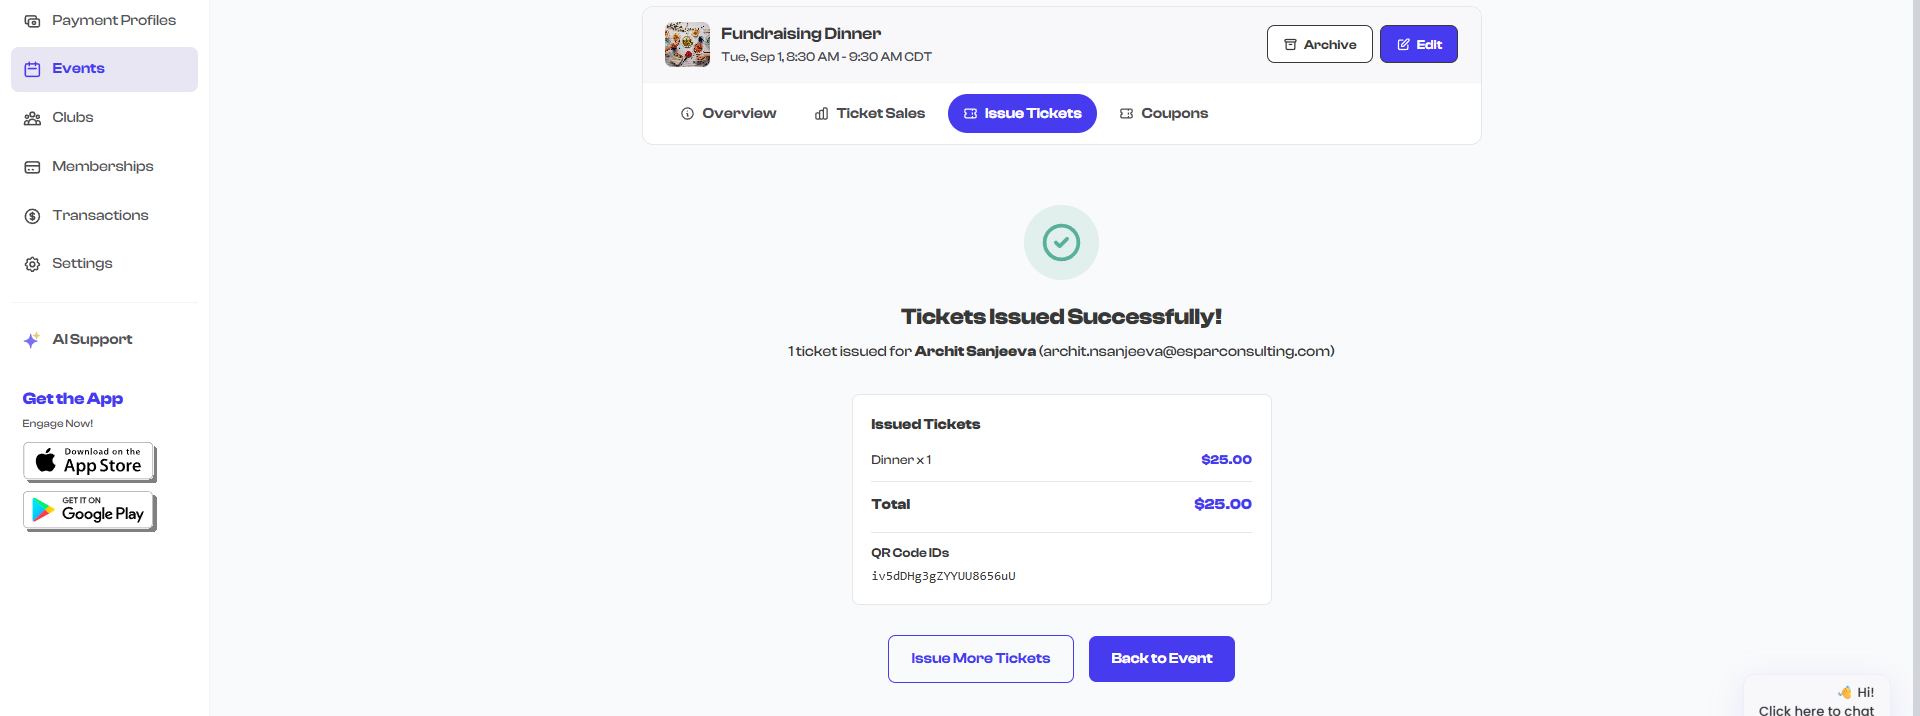
If you are issuing tickets at the venue on event day, you can show the QR codes directly on screen for the attendee to screenshot or save. They can also scan them immediately at the check-in point.
How Offline Tickets Appear in Sales
Offline tickets appear alongside online tickets in the Ticket Sales view. They are included in the total ticket count and revenue statistics. The ticket detail side panel shows the payment method and any reference number or remarks you entered during issuance.
Canceling Offline Tickets
Offline tickets can be canceled the same way as online tickets. See Cancellation for details.
Offline ticket issuance does not process any payment through FeatsClub. It only records the ticket and the payment method for your records. The actual payment collection happens outside of the platform.